Overview
Welcome to the Atmega128 Datasheet page! Here, you'll find all the essential information about the Atmega128 microcontroller, a powerful and versatile AVR microcontroller designed for various applications.
Download
To download the PDF file, click the link below.
Pinout
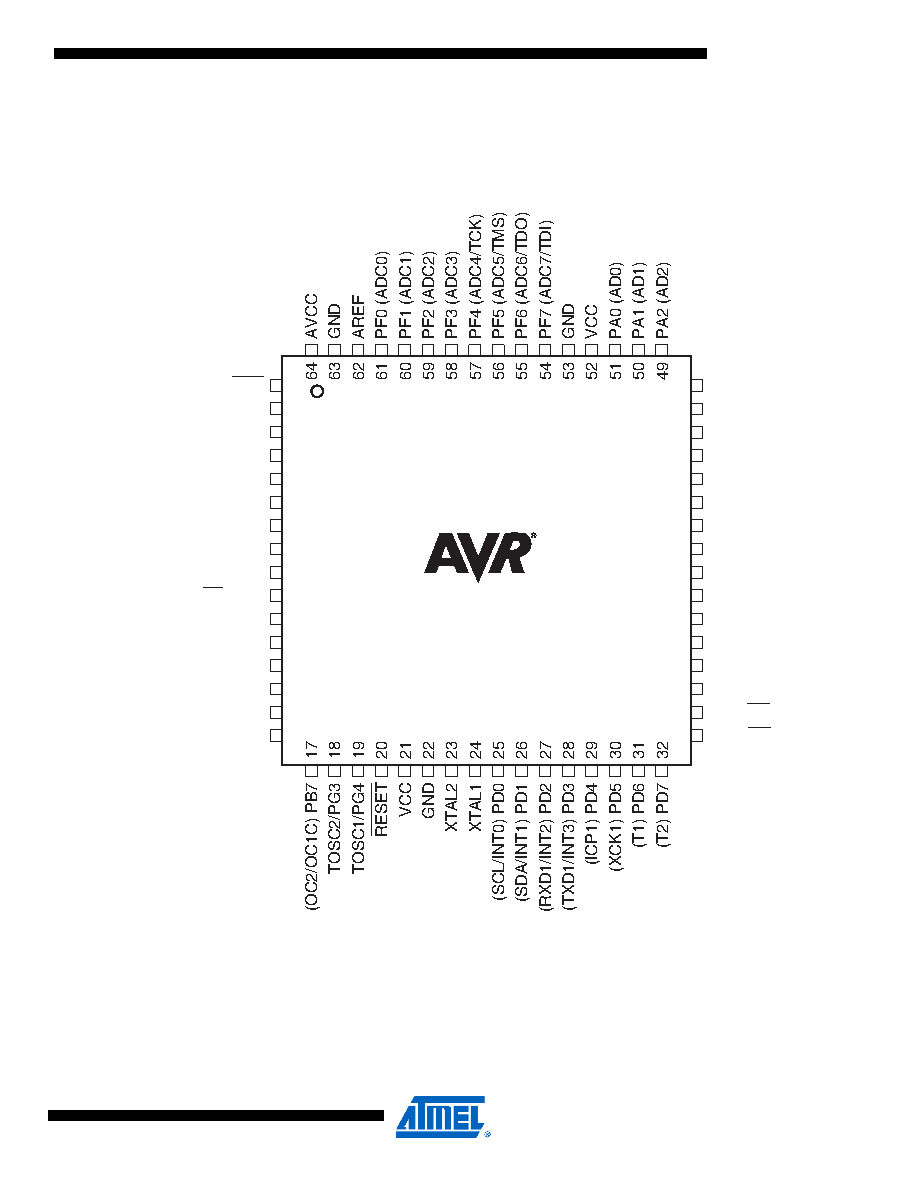
Take a look at the pinout diagram below to understand the arrangement of pins on the Atmega128 microcontroller:

Features
- High-performance, low-power AVR 8-bit microcontroller
- 128KB of in-system self-programmable flash memory
- 4KB of EEPROM
- 4KB SRAM
- 32 general-purpose I/O lines
Architecture
The Atmega128 microcontroller is based on the AVR enhanced RISC architecture, which includes a wide range of instructions, making it easy to execute most tasks in a single clock cycle. This architecture provides high-speed execution combined with low power consumption.
Memory
The Atmega128 has 128KB of in-system self-programmable flash memory, which allows the microcontroller to be reprogrammed even while it is in the application circuit. It also includes 4KB of EEPROM for long-term data storage and 4KB of SRAM for faster data access.
Communication
The Atmega128 supports various communication interfaces, including USART, SPI, and I2C, enabling seamless connectivity with other devices and peripherals. This makes it suitable for applications requiring communication between multiple components.
Applications
The Atmega128 microcontroller is widely used in various applications due to its versatility and powerful features. Some common applications include:
- Home Automation Systems
- Industrial Automation
- Robotics
- Automotive Electronics
- Smart Agriculture
Its rich set of peripherals, ample memory, and robust communication options make it an excellent choice for a wide range of projects.
Development Environment
For programming and development using this microcontroller, we recommend using popular IDEs like Atmel Studio or Arduino IDE. Additionally, you can find a wide range of libraries, examples, and resources online to kickstart your projects with ease.
Whether you are a beginner or an experienced developer, this microcontroller offers a great platform for exploring the world of microcontrollers.
Hardware Setup
When designing a project with Atmega128, it's essential to have a proper hardware setup. Below is a sample circuit diagram to get you started:

Make sure to connect the power supply, crystal oscillator (if used), reset circuit, and other required components as per your project's requirements.
Power Consumption
The Atmega128 microcontroller is designed with power efficiency in mind, making it suitable for low-power applications. It offers various power-saving modes, allowing you to optimize power consumption based on the project's requirements.
To achieve the best power efficiency, consider utilizing sleep modes, clock prescaling, and disabling unused peripherals when they are not in use.
Programming Guide
Programming this microcontroller can be accomplished using various programming languages and tools. If you prefer C/C++, you can use the AVR-GCC compiler and avrdude to program the microcontroller.
For those who are familiar with Arduino, this microcontroller can be programmed using Arduino IDE with some minor adjustments.